European Legacy Dobermans

Nobility, Strength, Beauty!!
European Legacy Dobermans
|Home|
|European Standard|
|American Standard|
|Breeder's Info|
|Our Dobes|
|Articles|
|European dobermans|
|For sale|
|Contact|
|Links|

     History of Cropped Ears and Docked Tails

     Dobermans from the days of the breed creation had their tails docked and their ear cropped. In Germany 100 years ago dog owners had to pay taxes on their dog, unless the dogs were "working dogs". One can distinguish a working dog by its docked tail.

     Louis Dobermann was trying to create a working dog and since the early days of the breed, Dobermans had their tails docked. Many of the dogs of that time were born without a tail. During WWII a lot of Dobermans were lost and the bob-tailed gene has disappeared from the modern bloodlines.

     Louis Dobermann wanted to create a dog that looked very alert. So he decided to crop the ears to achieve that look.

     Nowadays some countries in Europe do not allowed cropped ears and docked tails. But Poland, Serbia, Austria, France, Greece, Romania, Switzerland, Slovakia, Russia, Moldavia, Ukraine & the Baltic do show cropped/docked Dobermans. Here in America we do show Dobermans with their ears cropped, tailed docked and dewclaws removed.

     If you buy a puppy from European Legacy, we can have his ears cropped for an additional $250. Should you decide to take your puppy to your local vet and have his ears cropped upon arrival, then take our advice, choose your vet carefully. Do your homework, find a vet who is experienced in cropping Doberman ears, if possible ask to see pictures of the vets previous Doberman crops. We recommend you to have the ears cropped at 8-10 weeks. If the crop is performed after 12 weeks, the ears may take a long time (up to a year) to stand up and sometimes they won’t stand at all!

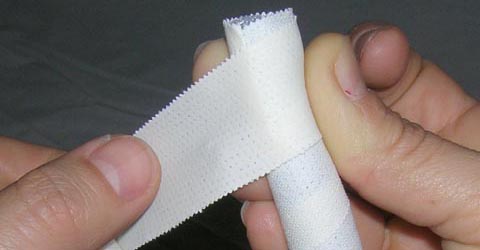
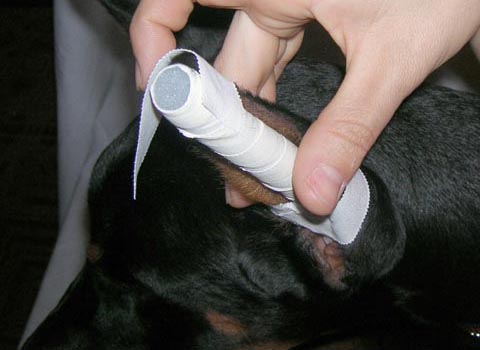
     The cropped ears will require your patience and consistency. It is not difficult to tape ears, but you have to continue taping until they REALLY stand. When you unwrap them after 5-6 days to renew the wrap, don't leave them unwrapped for more than 20 minutes or so. Immediately wrap them again. After a couple of months you can see if they stand, at the FIRST sign that they may come down, wrap them again. How long do you need to tape? It really depends on the dog, the type of ears he has, and the ear-crop (there are short, medium and long types of ear-crops). More than likely it will take you 2 to 4 months of taping.

     Never tape or post infected ears. Also remember to clean the ears from glue after removing the tape with Peroxide or Rubbing Alcohol.

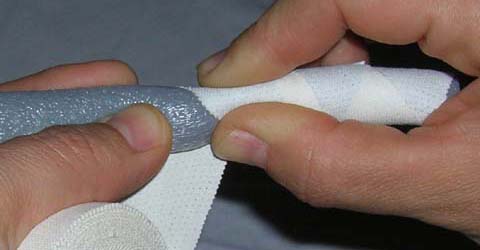
     You can start wrapping only after the edges are healed, and there are no scabs anywhere on the edges. You will have to care for the edges, by applying neosporin and rubbing it gently to soften the scabs. In a few days after cropping you will be ready to wrap the ears.

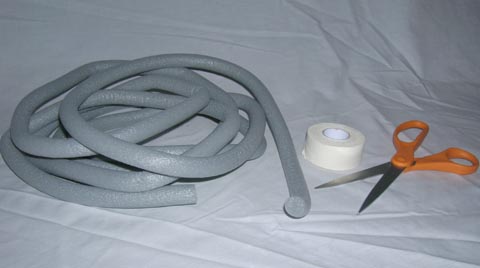
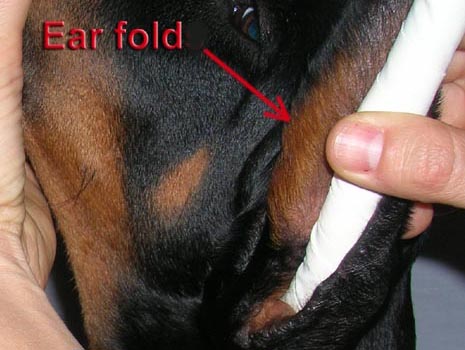
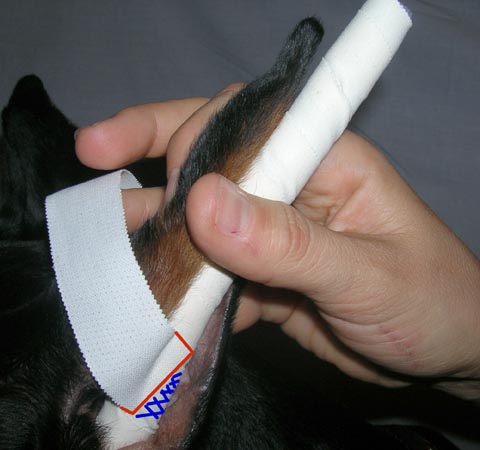
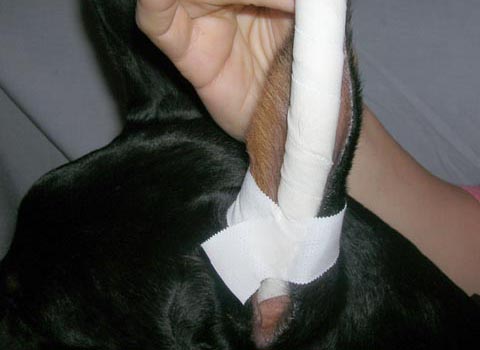
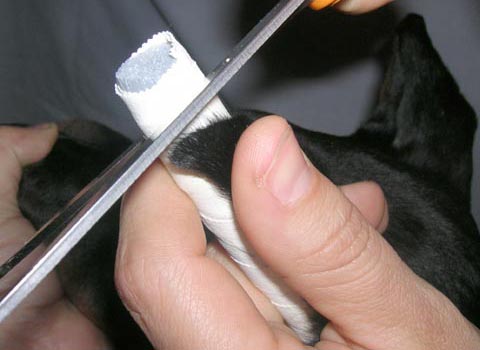
     There are several methods of taping or posting the ears. Here I would like to describe one of them. I have used 2 other methods of “no tape ear taping method” and “spiral taping” method. 
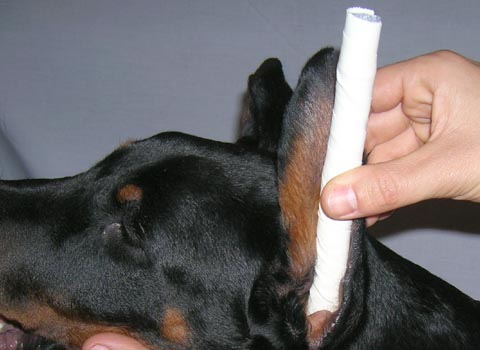
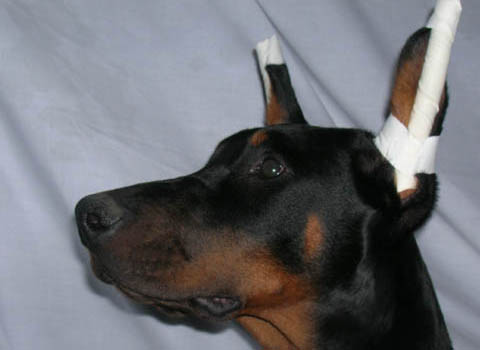
I would like to warn you that one needs to be careful that the ears would stand symmetrically and in the right position to the head. If you see that one ear is falling inwards or forward, you need to take the steps to correct the problem.


The method below was shown to me by my veterinarian Dr. Soltero of Scottsdale Arizona and it really did help me to correct the ear-position, when one of Feliss ears was falling inwards. I highly recommend it. Just make sure to intervene in a timely matter if you have a problem, as if you wait too long the ear(s) may never stand right.

You need for taping doperman puppy's ears:<br>
Peroxide or Rubbing Alcohol, Backer Rod 5/8” wide (ask in any HomeDepot), Tape,
Scissors
Picture 1

First step for ear taping method. Start taping firmly around the rod to achieve the flexible 
but tight ear-stick.
Picture 2

Step 2 for ear taping method: Reverse and start taping in the opposite direction, 
making sure that the sticky surface is now outside of the ear-stick
Picture 3

 Step 3 for ear taping method:  Continue taping until all of the surface of the rod is taped with the sticky surface facing outwards.
Picture 4

Step 4 for ear taping method: Press the sticky rod to the inside of the ear. Stretch the ear along the rod.
Picture 5

Start taping around the base in the direction of ear fold
Picture 6

Take one of the 6” strips and press one end into a sticky surface of the rod (under an angle) 
(See red line).
Picture 7

Cut the end of the tape
Picture 8

Cut the rod at the top of the ear.
Picture 9

Tape around the very top of the ear lightly, 
you can cut off circulation by putting too much pressure.
Picture 10

Doberman puppy with ears taped.
Picture 11

     Ear Taping (posting) method


     Post the ears and leave them up to six days, then take down but never leave them un-taped overnight. Re-tape the ears for another 6 days.

     You need (See picture 1):
Peroxide or Rubbing Alcohol.
Backer Rod 5/8” wide (ask in any HomeDepot)
Tape
Scissors


     Start by cutting the piece of Backer rod, a little larger than the length of the ear.


     Take tape and start taping firmly around the rod to achieve the flexible but tight ear-stick. (See picture 2).


     When you have taped it to the end, reverse and start taping in the opposite direction, making sure that the sticky surface is now outside of the ear-stick (See pictures 3 and 4). Continue taping until all of the surface of the rod is taped with the sticky surface facing outwards.


     Now tape the second rod in the same manner. Cut 2 pieces of tape 6-7” and 2 shorter pieces of 3”.


     Clean the ears with the tampons and the rubbing alcohol if you have not already done this, if the ears are not quite healed use peroxide instead. Dry the ears thoroughly with a dry paper towel.

     Press the sticky rod to the inside of the ear. (Picture 5) Stretch the ear along the rod.


     Take one of the 6” strips and press one end into a sticky surface of the rod (under an angle) (See red line on the picture 7). Leave the blue area (sticky surface) to be able to secure a good grip for the other end of the tape strip. Start taping around the base in the direction of ear fold (See Picture 6) (towards the inside), making sure that the fold is not twisted or squeezed. Be careful do not tape too tightly, as it may stop the circulation of blood into the ear. Go around the ear one time and press the tape against the blue area (sticky area) of the rod.


Cut the end of the strip. (Picture 8)


     Cut the rod at the top of the ear. (Picture 9)


     Tape around the very top of the ear lightly, you can cut off circulation by putting too much pressure. (Picture 10) The sticky surface of the rod and the sticky surface of the tape will keep the rod in a secure position.


     Do the same procedure with the second ear. Using this method, you do not need to tape in-between the ears. The rods will keep the ears in the vertical position. (Picture 11). The dog will be able to move the ears freely and you will avoid wrong posting that sometimes happens when one ear is taped to the other ear in a figure 8-manner - then one ear might be pulling the other into the wrong position and creating a crincle. It offten happens during sleep, when the dog may accidently lay on one of the ear and pull the other one in an awkward position.

Our recommendation is to make sure that ear cropping is only done by those who have a great deal of experience with cropping ears of dobermans. In Phoenix area we recommend
Soltero R E DVM,
Saguaro Veterinary Clinic,
8426 McDonald Dr., Scottsdale
ph. (480) 948-1770

European Legacy kennel is located in Phoenix, AZ, USA
ph. 602-7280555
email: ron@wwdl.net

|Home|
|Breeder's Info|
|Hit|
|Feliss|
|History|
|Puppies|
|European dobermans|
|For sale|
|Contact|
|Links|